
Overwatch 2 Maps Guide: The Best Heroes for Every Map in 2023
| Tags: Activision, Ana, Blizzard, D.Va, Diablo, Features, King, Mobile, Overwatch, Overwatch 2, StarCraft
| Author Paul Goño
Dominate your matches with the best picks for every map in Overwatch 2.
Overwatch's gameplay allows its players to freely pick and choose the best hero for the job. With an impressive roster of 30+ heroes, its variation in team comp is one of the game's biggest hallmarks. It makes sure that every match-up feels fresh and unpredictable. Every game becomes an exciting new chance to learn, adapt, and engage with different characters and playstyles. But the map you're in can either highlight or suppress your strengths.
The world of Overwatch showcases futuristic environments that are modeled after our own. With over 25 maps released throughout its 6-year run, Blizzard-Activision's team-based game offers its players plenty of different playgrounds. But each game can feel like a coin toss depending on which skills you decide to bring to the table. Now that map pools are removed, let's take a look at the hardest hitters in Quick Play and Competitive (and who to counter them with).
Maps in Overwatch 2
- Control
- Antarctic Peninsula (Labs, Icebreaker, Tunnels)
- Busan (Downtown, Temple, MEKA Base)
- Ilios (Lighthouse, Well, Ruins)
- Lijiang Tower (Night Market, Garden, Control Center)
- Nepal (Village, Shrine, Sanctum)
- Oasis (City Center, Gardens, University)
- Escort
- Circuit Royal
- Dorado
- Havana
- Junkertown
- Rialto
- Route 66
- Shambali Monastery
- Watchpoint: Gibraltar
- Hybrid
- Blizzard World
- Eichenwalde
- Hollywood
- King's Row
- Midtown
- Numbani
- Paraíso
- Push
- Colosseo
- Esperança
- New Queen Street
Maps Out of Play
- Hanamura
- Temple of Anubis
- Volskaya Industries

Game modes
Control has both teams compete for an objective area found between their spawn points until completion. Your team must wrest and maintain control of the point until you reach the 100% mark.
Escort lets Attackers side push the payload toward the Defenders' base on the other side of the map. The game ends if the payload makes it to the very last point, or when the Attackers are kept away from the vehicle and run out of time. Successfully getting the vehicle to a checkpoint increases the offensive team's timebank. The game progressively gets more difficult as the Attackers approach their enemy's spawn point. Defenders may stop their enemy's progress by staying in close proximity with the payload. In competitive mode, positions are switched after every round, and the winner is decided by who pushed their cart the farthest.
Hybrid maps combine Control and Escort game modes. The Attackers must claim a control point before they get access to a payload they then escort to the enemy base.
Push is a new game mode that came with the sequel's release. Both teams compete for a friendly robot that pushes a barricade toward the other team's base. The robot remains neutral until one side takes control. If the robot gets reclaimed, it will turn around and leave your barrier to push the enemy's. The team with the most distance pusghed on their barrier wins. Push's more lively format has effectively replaced “Assault”.
Complaints about Assault's endless stalemates and ceaselessly boring stalls made Blizzard completely remove the game mode. Often dubbed as “2CP”, this game mode had both teams struggle for 2 control points as the clock counted down.

Antarctic Peninsula
Overwatch 2's version of a futuristic south pole holds plenty of secrets hinting at its soon-to-be-released story mode. It's ice-covered landscape is dotted with research buildings and man-made tunnels filled with winding passages, tight corridors and cramped control points. Have we mentioned that you can play with an adorable penguin colony?
The absolute scale on each of Antarctic Peninsula's aurora-lit submaps makes you feel like the world of Overwatch is getting larger and larger. The design of each of the submaps encourage and reward flanking/dive comps, so make sure you keep an eye on your backline supports!
Labs – Attackers start in a wide building housing an abandoned hydroponics lab. From there, they race across a small clearing to make it past a small circle of buildings surrounding the control point. The most direct path to the attacking side is one long, open sightline. On one side, stairs lead to higher ground that connects both sides. Additionally, a small ramp on the control point also provides some cover for retreating heroes. Alternatively, Use the longer path that arcs around the buildings themselves to flank quietly. This way has plenty of cover and a sharp drop off, so be wary of heroes that can boop you off the map.
Icebreaker Ship – The most interesting submap of Antarctic Peninsula gives players a look at the abandoned icebreaker that was involved in the failed rescue mission to save Mei's Ecopoint team. The industrial design gives way to tall platforms and side entrances that gives players plenty of ways to lose pursuers. The amount of cover makes it difficult for aerial heroes to thrive, but it isn't impossible.
Ice Tunnels – Low-lit areas snake around and through Antarctica Peninsula's third sub-map. Most players tend to have their sights set on the main focus of the map. This opens up plenty of opportunities to use the side paths around the map. With that said, this entire map is a flanker's paradise, so peeling for your supports is vital to winning teamfights. Mobility is key, so don't stay in one spot for too long. And beware Reaper mains.
- The Best Heroes for Antarctic Peninsula
- Ashe
- D.Va
- Genji
- Moira
- Orisa
- Ramattra
- Sigma
- Soldier: 76
- Torbjorn
- Best Counters
- Genji
- Ramattra
- Symmetra
- Wrecking Ball

Blizzard World
This huge amusement park is a happy mishmash of Blizzard's greatest hits. Entire sections dedicated to Diablo, Starcraft and more can be seen as the payload takes the Attacking side through the (meta) hybrid map.
Games start with the defender's side holding their ground behind a barrier that hides the control point from incoming foes. The first real “chokepoint” is through the main entrance flanked by tall statues. Another entrance leading to a concession booth can be found off to one side. This path is a favorite for those who want to disrupt the Defending team's bunker comp.
If Attackers manage to capture the point, they will need to escort the payload all the way across Blizzard World's many amusements. Aerial heroes can take advantage of the open area as well as the platforms to pepper damage from above. Past chokepoints that curve under a bridge, the Starcraft area bleeds into a Diablo-themed cathedral. As with all escort maps, things get claustrophobic. Snipers and grenadiers are useful in this stage, but be prepared to counter dive comps.
- The Best Heroes for Blizzard World
- Ana
- Echo
- Junkrat
- Pharah
- Soldier: 76
- Tracer
- Widowmaker
- Best Counters
- Genji
- Hanzo
- Mercy
- Roadhog
- Winston
- Zenyatta

Busan
Set in one of South Korea's biggest tourist destinations, the small maps that make up Busan offer plenty of opportunities for every kind of playstyle. As it blends the traditional and modern, it also combines important chokepoints and plenty of cover to make this Control map a favorite for dive comp heroes. Additionally, snipers and backline supports can also use Busan's tight corners and nearby health packs to escape from enemy flankers who especially thrive in the second sub-map.
Downtown – our first sub-map has the heroes spawn on opposite sides of a train station control point flanked with Busan's city buildings. A round platform overlooks the map's objective, and one side of the station's control point goes off the edge of the map.
Temple – Busan's cultural center becomes a warzone as both teams contest a very tight control point. Suppressive fire from long range can force your enemy to hide in one of the side areas or retreat. Using the large pillars in the center of the map offers a lot of cover, but may place you in close quarters with the enemy. Practice situational awareness, as flankers have easy ways to sneak past your front line.
MEKA Base – Past Temple's garden environment is a futuristic factory of steel. MEKA's base of operations combines the best parts of Downtown and Temple, and even holds a few easter eggs. The map features decisive chokepoints and a wide drop-off near a control point surrounded by high ground. Brawlers are right in their element when it comes to contesting MEKA Base's control point, so have an escape plan whenever you dive into the objective.
- The Best Heroes for Busan
- Ana
- Baptiste
- Cassidy
- Echo
- Lucio
- Reinhardt
- Sigma
- Sombra
- Widowmaker
- Best Counters
- Genji
- Reaper
- Sojourn
- Torbjorn
- Widowmaker
- Winston

Circuit Royal
Overwatch 2's beta-stage map gives players an opulent experience in its grand depiction of a futuristic Monaco. In this Escort mission, Attacking heroes must fast-track a hovering racecar through Circuit Royale's lavish and shop-lined streets to reach its endpoint: the luxurious inn that the Defenders guard.
As defenders, use the stone bridge near the first turn of the map to pin the enemy down. Flankers can enter the fray from any of the side-buildings and exit just as quickly. Strong hitscan heroes can deter the enemy's advance if you've got a good on on your team. Opportunities to bunker down beneath the bridge also come with its advantages, despite losing the height advantage. The struggle for Point B turns into a literal uphill battle, forcing you to fight for control on a steep path. Flankers should disrupt the opponent using the right-hand stairs to get to the backline.
Circuit Royal's environment completely shifts as you finally enter the hotel. The final stage provides high balconies that attackers can use to pressure defenders, but bunker comps can easily seek cover behind nearby corners to avoid charging enemy ults. Often, dive heroes are used to clear the way for the rest of the team to push the payload.
- The Best Heroes for Circuit Royal
- Ana
- Ashe
- Doomfist
- Hanzo
- Soldier: 76
- Widowmaker
- Winston
- Best Counters
- D.Va.
- Junkrat
- Sombra
- Widowmaker
- Sigma

Colosseo
Centered around once of the world's wonders, Italy's Colosseo is arguably the most challenging Push maps for new teams. Each section of the map encourages defending teams to engage from a distance, with sightlines that stretch far. Past the Coliseum's curving corridor, attackers will usually encounter resistance on the ground before they reach the café under the bridge. The chokepoint under the bridge is where players typically get halted in their advance.
Effectively disrupting mid-ranged DPS players with brawler picks will help your team advance. Crowd control is king when you enter engagements past the Coliseum. Additionally, any hero that lets you hold your own against people on the high ground is a good choice in Colosseo. Combining smart picks and team communication can see TS-1 blaze through Rome's Push map in a matter of minutes. Just don't get too distracted by the view.
- The Best Heroes for Colosseo
- Ashe
- Doomfist
- D.Va
- Lucio
- Sigma
- Soldier: 76
- Tracer
- Winston
- The Best Counters
- Ana
- Brigitte
- Moira
- Roadhog
- Sombra
- Zarya

Dorado
A classic Overwatch map, Dorado's payload cart pushes up through quaint village streets, a festive plaza, and a giant Ziggurat housing the map's final checkpoint. Attackers must make a grouped effort to reach the first checkpoint, as the first stage's environment offers plenty of advantageous spots for defenders to capitalize on.
Attackers with vertical mobility and flight capabilities have the best chances to scramble enemy defenses early in the game. Point A is ultimately taken by the side that controls the chokepoint below the roofed bridge. Shield tanks are vital in defending against off-angle attacks and aerial assaults, especially after recent changes. Defenders may also populate the high balconies that lead up to Point B. Maintaining control over key locations can be extremely pivotal in this phase. Defending heroes can expect an aggressive turn of events here, so maximize every skill you have from safe vantage points to turn the tide.
Finally, entering the “LumériCo” power plant presents new challenges as the invading team must crest its most challenging hill yet. The platforms and walkways ensure that the defending side always has a clear line of sight on all of the invading opponents. Brawlers shine here for their ability to sustain themselves despite the height disadvantage, and to stall long enough for downed team mates to return.
- The Best Heroes for Dorado
- Baptiste
- Echo
- Genji
- Hanzo
- Lucio
- Mercy
- Soldier: 76
- Sombra
- Winston
- Wrecking Ball
- The Best Counters
- Bastion
- Junkrat
- Roadhog
- Sojourn
- Sombra
- Torbjorn
- Widowmaker

Eichenwalde
In this Hybrid map, players revisit the war-torn battleground that was secured by the Crusaders in Reinhardt's “Honor and Glory” animated short. Set in post-omnic crisis Germany, Eichenwalde is another classic Overwatch playground that rewards every playstyle in the game. After arriving in the outskirts of an emptied village, attacking heroes are presented with an arduous climb. Pushing under a stone bridge has attackers contest for the payload in an war-torn courtyard. Getting to Point B activates the battering ram on the payload and blasts the castle doors open in the final siege for Point C.
Attackers unwilling to deal with enemy fire under the bridge will seek shelter in one of the side buildings in front of the point. Those braving the assault can easily deter the enemy with the elevated positions overlooking the first objective. Brawl and dive comps are popular here. With that said, off-angle attacks from your foe can often win the game. The fight for Eichenwalde castle is difficult, since defenders have a major height advantage. Use the battlements above to ping enemy targets for team awareness. Lastly, like all hybrid maps the final stage chaotically brings enemies closer in a high-stakes battle for the win. Use self-sustaining heroes to help your team break through enemy lines.
- The Best Heroes for Eichenwalde
- Ashe
- Brigitte
- Cassidy
- Lucio
- Mei
- Moira
- Orisa
- Pharah
- Reaper
- Reinhardt
- The Best Counters
- Bastion
- Hanzo
- Junkrat
- Sombra
- Torbjorn
- Zenyatta
- Widowmaker

Esperança
Esperança's Push map shines brightly in Overwatch 2. The sunny coastal port town holds much to be discovered, as winding paths and back alleys lead players to every section they need to get to. It's design easily makes it one of Overwatch's finest environments, fostering teamplay to advance their barrier amidst constant flanks. Widow mains will be delighted to make use Esperança's many windows and balconies to suppress enemy advancements. Due to its open design, high-mobility operatives often go up against bunker comps for control over TS-1.
Positioning is a huge factor in winning Esperança. The centre of the map features several pivotal high ground locations, and dominating them will have much impact. You'll need to move the cargo through a lot of open terrain, so take care to avoid being ambushed when you traverse particularly wide gaps outside of cover.
- The Best Heroes for Esperança
- Ashe
- Baptiste
- Echo
- Genji
- Kiriko
- Orisa
- Sigma
- Sojourn
- Wrecking Ball
- The Best Counters
- Bastion
- Reaper
- Sombra
- Tracer
- Widowmaker
- Zarya

Havana
In Havana, players must navigate the vivid, colorful streets of Cuba's capital to deliver a payload to an enormous castle fort.
The road to Point A is two turns away from Attacker's spawn. The entire way is optimal for sniper mains who can utilize the long sightlines that precede the distillery's entrance. The open plaza also opens up the map to every kind of playstyle, with minimal cover that give supports a quick escape.
The cramped industrial area leading to Point B gives Defenders the advantage to suppress incoming Attackers from the high ground. Dive heroes thrive here as a consequence, and bunker comps find the most success in stopping the payload's advance. Sniper mains can still find picks here despite the backline being more vulnerable.
Point C lies in the courtyard of an imposing castle fortress. Here, the battleground opens up, allowing more verticality for aerial heroes. After leaving the distillery, a dirt road ramps upward before it makes it's way across a bridge. Use the broken ramparts to suppress the Attacker's advance. If you find yourself on the opposite side, having a strong shield tank becomes vital in gaining more territory on that bridge.
- The Best Heroes for Havana
- Ana
- Ashe
- Baptiste
- D.Va
- Kiriko
- Mercy
- Orisa
- Roadhog
- Soldier: 76
- Widowmaker
- Best Counters
- Genji
- Lucio
- Mercy
- Sigma
- Sojourn
- Wrecking Ball
- Zenyatta

Hollywood
Set in sunny Los Angeles, Overwatch's Hollywood map is a love letter to all the movies we grew up watching. Tight routes and open-air combat make the endeavor of escorting a sassy film director past the half-completed movie a worthwhile struggle. The objective is fought in a plaza flanked by a café and a building. Capturing the limo lets you guide it through a Hollywood block. The old-timey Western set winds along a path to the main building which houses sci-fi alien backdrops. The last point is fought near defender's spawn where both sides fight over the critically-acclaimed auteur's attention.
Opportunities abound for flanks and drawn-out firefights. The café in the early game area gives bunker tanks a good place to set up while the middle portion of “Tinseltown” offers plenty of high ground. Placing important damage dealers in an elevated position could make or break a game. Lastly, dive comps are favorable when taking the last point of the glamorous studio set. Organized attacks are the way to go when defenders start using bunker comps to stop the limo's advance, so avoid trickling in.
- The Best Heroes for Hollywood
- Brigitte
- Hanzo
- Junkerqueen
- Mei
- Soldier: 76
- Winston
- The Best Counters
- Bastion
- Genji
- Junkrat
- Roadhog
- Wrecking Ball
- Zenyatta

Junkertown
A wildly chaotic battleground set in a desert shanty town, the home of the Junkerqueen is one of the most versatile environments seen in the game. This map is a wild ride for dive comps, and flanking players can get in on the fun too.
Surrounded by auto shops, the wasteland offers a hostile environment right outside of Attacker's spawn. Bridges and platforms with quick escapes all work towards the Defender's advantage. Players may expect bunker comps right out the gate, so avoid dive comps in the early game. Highly mobile tanks like Doomfist and Wrecking Ball work well to divert attention away from the spawn doors. The payload brings a treasure hoard across no-man's-land until it reaches Junkertown's massive gates. Defenders still hold the long-range advantage here, but dive tanks like Winston can easily force them to reposition.
Junkertown's high ground stretches along one side of the payload's path. Presence is needed here to make sure that the Defenders don't fully capitalize on the advantage. On the other hand, distractions from these areas can also provide high-value flanks around struggling attackers. The Junkerqueen's throne awaits in the very end of the final area. Use the rotating platforms to get a leg up on your opponents, and use the rooms on the side to escape and recuperate. Shield tanks like Zarya and Sigma can push encroaching defenders back while other aerial heroes control the skies. Dive comps are very common in the tight zones, so keep an eye on supports.
- The Best Heroes for Junkertown
- Ana
- Ashe
- D.Va
- Lucio
- Reaper
- Roadhog
- Sigma
- Wrecking Ball
- Widowmaker
- The Best Counters
- Echo
- Orisa
- Winston
- Zarya
- Zenyatta

King's Row
Being a universal fan favorite, King's Row lets players brawl in a post-Omnic crisis warzone. The hybrid map has attackers claiming the payload after clashing in a city square. The payload is then carried through London's ritzy neighborhood, getting closer to the underground factory complex which serves as the final checkpoint.
King's Row offers plenty of high vantage points for snipers to maximize. On the other hand, Echo and Pharah are very good at fending off ambushers from the backline. London gives Ana a lot of space to control the flank, using her Sleep Dart to escape from Reapers and Wrecking Balls when she can. Capture the upper ground whenever you can once you reach the factory to give your allies time to push. Protectors in King's Row should also keep their distance when setting up to discourage assassins from straying too far from their team.
- The Best Heroes for King's Row
- Brigitte
- Cassidy
- Hanzo
- Junkrat
- Lucio
- Mei
- Moira
- Reaper
- Reinhardt
- Sigma
- Widowmaker
- The Best Counters
- Brigitte
- Cassidy
- Echo
- Pharah
- Sombra
- Winston
- Wrecking Ball
- Zenyatta

Lijiang Tower
This commercial megacomplex gives players a very practical map whose sharp architecture complements every player's way of approaching the game. As both teams make their way up the state-of-the-art city region, each match gets more exciting than the last. Its hidden side paths and enclosed capture points make Lijiang Tower a flanker's delight, so keep a watchful eye on your supports to avoid getting wiped.
Night Market – Overwatch once again infuses the cultural foundations of society with a touch of modernity. Past food stalls and city eateries sits a large temple that both teams fight for. Railings on the outer side of the temple protect against a steep fall out to the city streets below, and foes can come in from any of the main area's 7 openings.
Garden – arguably the best map for Lucio, Garden is flanked by a tight line of small buildings that provide cover and respite from the battlefield in the center. A mirrored bridge on both sides of the map precariously curves towards the map's covered Control point, making it a risky trek back if you ever get downed.
Control Center – at the top of Lijiang Tower stands its control center. Consider using brawl comps and shield tanks to successfully traverse the hallway leading to the control point. Break your enemy's formation by placing dependable heroes on the high ground to provide overwatch on Control Center's objective. Opponents can come from any angle, so stick close to healers and focus on crowd control until you achieve 100% supremacy.
- The Best Heroes for Lijiang Tower
- Junkrat
- Lucio
- Mei
- Pharah
- Reaper
- Reinhardt
- Winston
- The Best Counters
- Echo
- Reaper
- Soldier: 76
- Sombra
- Zenyatta

Midtown
The city streets of the Big Apple makes its fabulous debut as Overwatch's first Hybrid map. In Midtown heroes compete over an adorable omnic-driven firetruck that seeks the fastest route to Grand Central.
Point A on Midtown boasts stylish map design that was introduced in the Overwatch 2 beta. Attackers can travel via the extremely broad primary chokepoint, which runs below a bridge. A small subway tube also connects to a railed platform overlooking the capture point. Defenders won't always know where the attackers are coming from, so utilize the large pieces of cover in front of the point when contesting.
The second point functions quite similarly to Watchpoint: Gibraltar's first point, but replaces the high ground with a descending tunnel. The defenders normally control the bridge above, but may also bunker down in front of the payload. Attackers looking to gain control of strategic positions should use dive comps, but should switch out once they reach the inside Grand Central Station.
The futuristic depiction of New York's largest train station is showcased in full as you approach Point C. Narrow sightlines around the first corner can be used to prevent dives and flying heroes from getting close. Mid-ranged combat erupts as Defenders usually work with brawl comps. Beware of getting pinned and stunned in the narrow hallway that leads to Grand Central's critical endpoint.
- The Best Heroes for Midtown
- Ana
- Brigitte
- Doomfist
- Genji
- Lucio
- Moira
- Reinhardt
- Sigma
- Soldier: 76
- Winston
- The Best Counters
- Junker Queen
- Junkrat
- Pharah
- Reaper
- Roadhog
- Symmetra
- Tracer

Nepal
Giant temples and snowy courtyards set in the Himalayan mountains provide deep context on the spiritual journey taken by one of Overwatch's most prominent characters. The Omnic monastery in Nepal lets players journey through narrow spaces to reach wide control points found in every map's center.
Village – the first control point is found at ground level between a courtyard that leads to higher ground and an indoor stable. Use the platforms to suppress enemies that go through the main thoroughfare, and opt for heroes with close-range capabilities to defend the cramped control point.
Shrine – a great open-air map where everyone can thrive, Shrine introduces Nepal's greatest environmental hazard beside its elevated control point. Aerial, Brawl, Dive, and Flanker comps can all find ways to take advantage of Shrine's unique environment.
Sanctum – what was once a serene temple is now up for grabs as both teams violently contest the Shambali's inner sanctuary. One of the paths lead to a health pack and a quick way down to the control point which sits beside a large pit. Unlike its first map, Nepal's indoor sanctum leaves open sightlines from corner to corner. As a result, long-ranged supports enjoy a wide line-of-sight while medium-ranged heroes dominate drawn-out firefights.
- The Best Heroes for Nepal
- Ashe
- Brigitte
- Cassidy
- Echo
- Lucio
- Mei
- Reinhardt
- Sigma
- Symmetra
- Zenyatta
- The Best Counters
- Baptiste
- Bastion
- Junkerqueen
- Soldier: 76
- Sombra
- Tracer

New Queen Street
Overwatch's futuristic take on a Toronto-inspired winter map was another welcome addition to the game when Blizzard released it in the Overwatch 2 beta. Unlike other Push maps, New Queen Street doesn't provide any favorable positions for snipers until the very last checkpoint. As both teams fight over “TS-1” through a winding path, attackers battle towards a hill that connects to the final objective. Forward spawns are hard-fought in this map, so situational awareness goes a long way.
- The Best Heroes for New Queen Street
- Baptiste
- Cassidy
- Doomfist
- Echo
- Genji
- Moira
- Sombra
- Winston
- Wrecking Ball
- The Best Counters
- Brigitte
- Hanzo
- Junkrat
- Pharah
- Tracer
- Widowmaker
- Zarya

Numbani
A shining beacon of technological progress in the savannah of Nigeria, Numbani stands as one of Overwatch's classic maps. With the switch to a 5v5 format, players will have to position themselves carefully among the side alleys and second-story vantage points. Attackers can either follow the main road — which provides the fastest route to the capture point — or follow the steps that lead to a side exit behind enemy lines. On the defender's side, turret heroes as well as snipers thrive with little to no threat from enemy flankers. Dive comps can be used to close the gap however, so adjust accordingly if you're on offense.
Taking the point will release the payload which travels across the shining metropolis. Parked cars and buses litter Numbani's streets, and the elevated platforms that guard the second objective make it a struggle for even the most hyper-mobile carries to disrupt bunker comps. Make sure to peel for your supports regardless of which side you're fighting on.
Lastly, the climb towards the plaza changes the flow of the game entirely. With less space to play with, flankers can better take the enemy by surprise when they use the small side entrances to get around your line-of-sight (LOS). Even with better macroplay, attackers may find themselves locked in place if the defending side hunkers down. That said, there's really no use hanging on to your ultimate when Numbani's final stretch becomes an all-out slugfest for supremacy.
- The Best Heroes for Numbani
- Ana
- Genji
- Hanzo
- Junkrat
- Kiriko
- Lucio
- Orisa
- Reaper
- Zenyatta
- Best Counters
- Doomfist
- Mercy
- Reinhardt
- Roadhog
- Soldier: 76

Oasis
Set in one of the most technologically-advanced places in the mythos, Oasis shows off its futuristic marvels in style. The jewel of the Arabian Desert rises first in its bustling City Center, and leads to one grandiose environment after another. Seek the high ground to cover troops on the ground and gain the upper hand.
City Center – Oasis' first capture point is a hotspot for stalls and frequent flanks. The circular courtyard is an absolute playground for heroes like Lucio and Wrecking Ball. Other agile heroes can easily contest the point while using the pavilion to avoid enemy fire.
Gardens – Gardens gives its players a regular game experience with an open Control map that lands right in the middle of the design spectrum. Cramped rooms and long halls around the capture point connect to an elevated area for mid-ranged heroes to make a significant impact.
University – team comps that focus on survivability and close-ranged combat tend to be the last one standing here. Dive contests are common here, so stay close to your tanks to avoid getting isolated. Similar to the one in Ilios, a large pit in the center can be used to take opponents out of the fight. Heroes with no vertical mobility will have to take the stairs to get back into the fight.
- The Best Heroes for Oasis
- D.Va
- Genji
- Kiriko
- Lucio
- Reaper
- Reinhardt
- Soldier: 76
- Tracer
- Wrecking Ball
- The Best Counters
- Brigitte
- Moira
- Roadhog
- Sigma
- Torbjorn
- Zarya

Paraíso
Heavily dotted with references to Lucio's background, Paraíso's map is one of a kind. In the new Overwatch 2 map, attackers make their way up from a scenic roadside beach and capture a green parade float. They then escort it through Rio de Janeiro's incredibly colorful residential district until they arrive at Lucio's nightclub. As opposed to Paraiso's airy aesthetic, nightclub places heroes in immediate vicinity. Much like Dorado's last checkpoint, melee brawl comps are essential to push through the bottleneck.
- The Best Heroes for Paraíso
- D.Va
- Genji
- Kiriko
- Lucio
- Reaper
- Sigma
- Sojourn
- Tracer
- Winston
- The Best Counters
- Bastion
- Moira
- Junkrat
- Pharah
- Reinhardt
- Roadhog
- Torbjorn
- Zarya
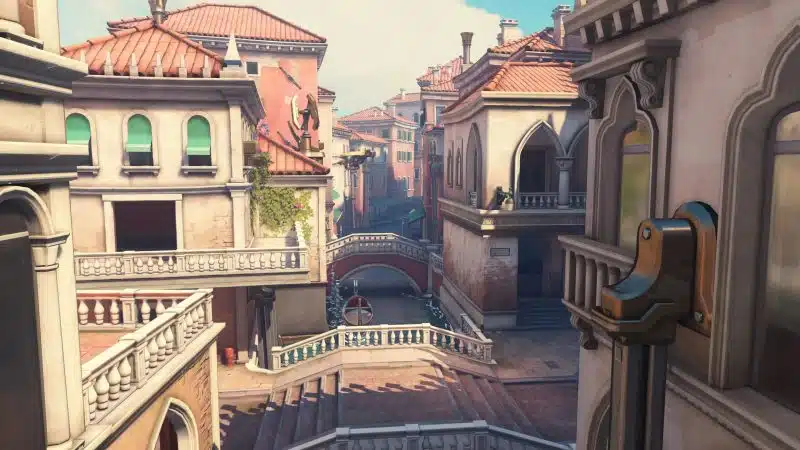
Rialto
Venice never looked so good. Decorated with marble banister bridges, Overwatch 2’s Rialto is a top notch example of good map design. Its first segment features short walkways that span the famous canals of the flooded city which leads attacking players to a small courtyard with side passages and opportune high ground. Be sure to mind your surroundings or you’ll be taking a swim.
Past the square lies a wide curved bridge that puts defenders face-to-face with oncoming invaders as they push their payload to the other half of the map. A whitestone building ahead features a lobby with tall windows that forces attackers to go around it to find the final objective within a Talon base.
Every one of Rialto’s map segments encourages every playstyle. Defender bunker comps and snipers should utilize high ground and long sightlines in front of enemy spawn. Awareness goes a long way here as attacking dive heroes can easily slip in and out of engagements around the venetian buildings. Almost every part of the map is outdoors which gives flying heroes enough space to make a significant impact in firefights.
Attackers must guide the payload up a small hill that features a choke point. Flanking heroes perform phenomenally here, as they can scramble Defense team formations by targeting backline supports while their team pushes.
- The Best Heroes for Rialto
- Ashe
- Baptiste
- Brigitte
- D.Va
- Hanzo
- Mei
- Orisa
- Sigma
- Soldier: 76
- Zarya
- The Best Counters
- D.Va
- Genji
- Roadhog
- Tracer
- Widowmaker
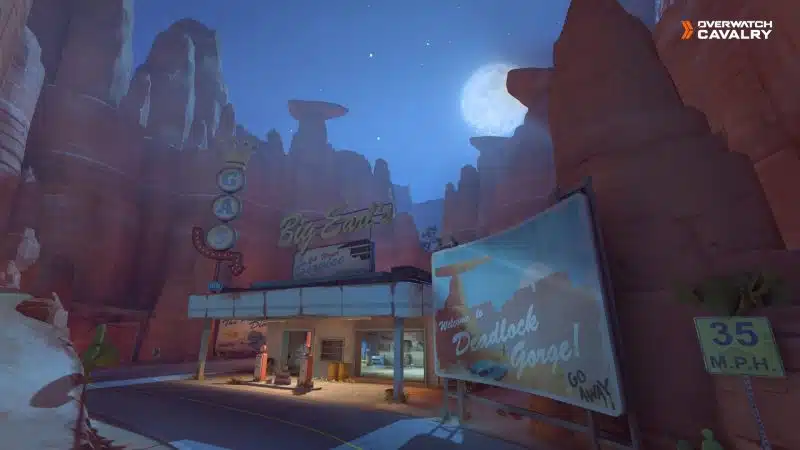
Route 66
Escorting the payload on Route 66 can feel like an odd journey through time. After making your way past a broken railroad, you'll pass by empty gas stations, repair shops, and an old-timey cafe before encountering the final checkpoint in a large industrial complex. The Deadlock Gorge earns its reputation by being a one-way trip back to spawn point if you venture too close to the edge, so don't get cocky.
- The Best Heroes for Route 66
- Ana
- Ashe
- Cassidy
- Genji
- Hanzo
- Mercy
- Mei
- Reinhardt
- Sigma
- The Best Counters
- Baptiste
- Brigitte
- Sombra
- Tracer
- Widowmaker
- Zarya

Shambali Monastery
A somber nighttime landscape stretches across a monastery once shared by two Omnic brothers. Shambali’s design perfectly reflects its order’s pacifistic dogma, inspiring those who walk its snow-covered steps to seek enlightenment in the midst of tumultuous times.
Shambali encourages attackers to take an early aggressive approach in their path to the summit. A mix of hitscan and dive comps are preferred when going against defenders in the high ground, who can use bunker comps and brawlers to stop enemies from advancing. The map slopes up and opens on a small courtyard holding the first capture point. The defender’s high ground has a good stretch of sight on pushing attackers. Meanwhile, a side building housing a 2-story repair shop provides good cover for those wanting to poke or distract enemy bunker tanks.
An arduous climb through the mountain leads the Monastery’s visitors toward a huge courtyard objective. When going through the tunnel, keep an eye on the stone “window” up above for enemy Junkrats. That said, the flexibility of Sigma’s Experimental Barrier works extremely well here, being able to cover teammates from above or in front. Further, the open courtyard gives both teams great sightlines for long-mid-range play. Here, aerial assaults from Defenders can be game-ending, so watch out.
Finally, the candle-lit temple curves out into a snowy path that takes players to the highest point of Shambali Monastery. Flankers can use the side alley to quietly get around attackers within the temple, so backline supports become prime targets here. Splash damage heroes like Junkrat and Ana can capitalize on the temple exit chokepoint to help their team score some kills. Something worthy of note is that Ramattra’s ultimate ability works extremely well in each of the map’s 3 courtyards, so coordinate with your team to avoid his ult’s dangerous radius.
- The Best Heroes for Shambali Monastery
- Ana
- Baptiste
- Cassidy
- Junkrat
- Ramattra
- Sigma
- Sojourn
- Soldier: 76
- Widowmaker
- Winston
- Best Counters
- Doomfist
- Genji
- Mercy
- Ramattra
- Reaper
- Zenyatta

Watchpoint: Gibraltar
Shown in one of the first trailers for the game, Watchpoint: Gibraltar served as Overwatch's orbital launch base before they disbanded.
Point A usually has attackers fighting defenders on the ground before challenging them on the higher ground. Aggressive heroes are usually needed to make defenders retreat back to the hangar entrance. The second area opens up to a hangar bay. Mobile DPS who defend on top of the ship can exercise control over battle engagements, so heroes like Pharah and Winston are essential. The uphill slope towards Gibraltar's launch site is punishing to traverse since defenders have a major height disadvantage. Well-hidden corners and side passages make this a haven for flank comps. Reaper absolutely shines in this map, so save Death Blossom for decisive moments.
- The Best Heroes for Watchpoint: Gibraltar
- D.Va
- Genji
- Reaper
- Sigma
- Sombra
- Tracer
- Widowmaker
- Winston
- The Best Counters
- Ana
- Echo
- Pharah
- Reinhardt
- Roadhog
- Widowmaker

Ilios
Overwatch's top tourist destination sees players duke it out for control over Greece's sunny vistas, winding stone paths, and unearthed ruins. These unique destinations have a lot to offer for bunker tanks and high-agility heroes — but don't get too comfortable. Some environments present hazards that could send you right back to spawn if you're not careful, so be extra wary of heroes that can push you off the map.
Lighthouse stands at the base of the Santorini-inspired island as Ilios' first objective. The small control point is nested right below the map's signature structure, inviting bunker tanks and melee heroes to claim its territory. Beyond the small enclosure is a cliff that shows a scenic view of the Mediterranean Sea, but don't stare out for too long. Use this to your advantage whenever you reclaim the objective.
Well is perhaps the most recognizable sub-map of Overwatch's Ilios. Past its white stone steps and blue-capped houses, players will find the huge, circular pit that gave the map it's name. Another picturesque drop-off can be found off to the side, so flanking can be difficult.
Ruins holds its control point in a sunken excavated site. The wide open spaces around the objective are especially good for heroes with flying capabilities, and the snipers that counter them.
- The Best Heroes for Ilios
- D.Va
- Junkrat
- Lucio
- Mercy
- Pharah
- Reinhardt
- Roahdog
- Widowmaker
- Winston
- The Best Counters
- Genji
- Reaper
- Widowmaker
- Wrecking Ball
- Zarya
For more Overwatch guides, follow ESTNN.